1) Configure the game for 1024x768 32-bit graphics mode.
2) Start the game using the "-dev" command line parameter (note that the "USER_NAME" subdirectory is named the same as your main Steam account login name):
"C:\Program Files\Steam\SteamApps\USER_NAME\Counter-Strike\HL.exe -dev"
"C:\Program Files\Steam\SteamApps\USER_NAME\Condition Zero\HL.exe -dev"
"C:\Program Files\Steam\SteamApps\USER_NAME\Day of Defeat\HL.exe -dev"
"C:\Program Files\Steam\SteamApps\USER_NAME\Half-Life\HL.exe -dev"
3) Start a new game, and choose the map that you wish to create the new overview map for.
4) Join any team, except spectator.
5) Execute the following console commands:
developer 1
dev_overview 1
hud_draw 0
If you are creating the overview map for Day of Defeat, execute the following additional console commands:
cl_hud_objectives 0
cl_hud_health 0
cl_hud_ammo 0
cl_hud_reinforcements 0
cl_hud_objtimer 0
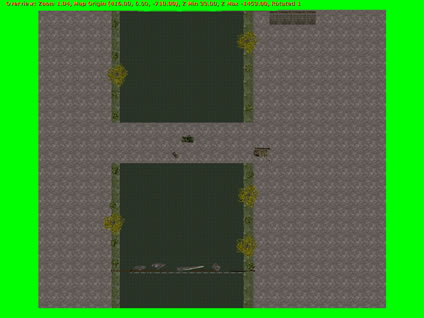
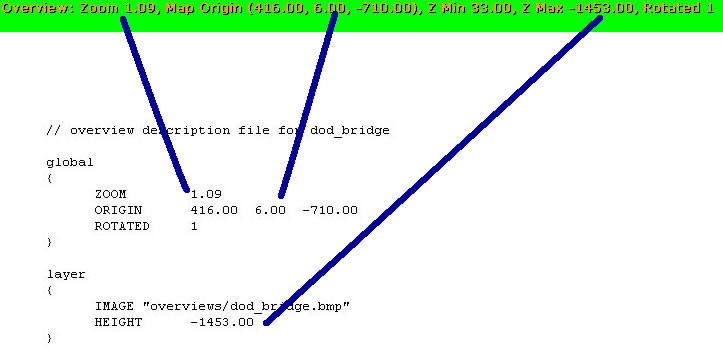
6) If everything worked properly, the screen should change to bright green, and you should see some parameters at the top of the screen.
7) If you are creating the overview map for Day of Defeat, press the "+map" key until the overview map is maximized (the default key binding for Day of Defeat is "M").
8) Use the "+attack" and "+attack2" controls to increase (or decrease) the size of the overview map so that it is at it's maximum size on the screen (the default key bindings are the left and right mouse buttons, respectively).
9) Use the "+forward" and "+back" controls to move and center the map left (or right) on the screen (the default key bindings are the up and down arrow keys, respectively).
10) Use the "+moveleft" (strafe left) and "+moveright" (strafe right) controls to move and center the map down (or up) on the screen (the default key bindings are the "A" and "D" keys, respectively).
11) Take note of the parameters at the top of the screen, but do not change the size of the screen (as this will affect the zoom setting).
12) Execute the console command "developer 0", press the ENTER key, and then close the console. The parameters at the top of the screen should then disappear.
13) Press the "snapshot" key to take a screenshot of the screen (the default key binding is "F5").
14) Exit the game.
15) Using Windows Notepad, create a new text file with the same filename as the map, and with a file extension of ".txt".
16) Edit the new text file using following parameters as they were displayed in "Developer Overview" mode while you were in the game:
17) Save the file, and exit Windows Notepad.
18) Decrease the color depth of the screenshot that you previously created to 256 colors (8-bit).
19) Ensure that the ".txt" format overview map parameters file, as well as the ".bmp" format overview map screenshot file are both named using the same filename as the actual map that you are creating the overview map for.
20) Lastly, copy both of the files to the correct "Overviews" folder for the respective games (again, note that the "USER_NAME" subdirectory is named the same as your main Steam account login name):
"C:\Program Files\Steam\SteamApps\USER_NAME\Counter-Strike\CStrike\Overviews"
"C:\Program Files\Steam\SteamApps\USER_NAME\Condition Zero\CZero\Overviews"
"C:\Program Files\Steam\SteamApps\USER_NAME\Day of Defeat\DoD\Overviews"
"C:\Program Files\Steam\SteamApps\USER_NAME\Half-Life\Valve\Overviews"